 |
| Value Selection Grid (‘4’ selected) |
I usually like to have a programming project to keep me busy over vacation. This year was no different. I decided to exercise my Java skills to create something that I would actually get some enjoyment from.
So, here it is - my vacation project for 2010: a Java-based Sudoku applet!
Full instructions for the game and all of the buttons and configuration options are included on this page. Scroll down past the game board to read them.
In Sudoku, the goal is to enter the values from 1 to 9 in the game grid
such that each value occurs nine times. The trick is that each value can
only occur once in each horizontal row, vertical column, or 3×3 block.
A certain number of starting values are given, and by applying logic and the
process of elimination, it should be possible to determine what the remaining
values should be. If you need help, the following site offers a great deal of
information on how to solve Sudoku puzzles:
http://www.sudoku129.com/puzzles/tips_intro.php
|
| Value Selection Grid (‘4’ selected) |
First, you need a board. The two methods of getting a board are described below. Once you have a board, you will need to enter values into the empty squares. You do this by selecting a value in the selection grid in the upper left corner, then clicking on the square where you would like the value to be placed. Clicking on a fixed square (indicated by the bold value and grey background) has no effect. Clicking on an empty square while in “Pen” mode (the default, see Pencil Marks below) will cause the selected value to be entered into that square. Clicking on a filled square will have different results depending on the value in the square and the currently selected value. If they are the same, the value in the square will be erased. If they are different, the value in the square will be changed to the value of the currently selected value in the selection grid.
| Empty Editable Square: | Filled Editable Square: | Fixed Square: |
You may notice that the border of a square is flashing either green or yellow. This indicates the square that will be affected by keyboard entry. If the square is flashing yellow, the square has a fixed value and will not change. If the square is flashing green, you may press the key for the value you want to enter into the square. Much like clicking on the square, the exact effect of the keyboard entry will change based on the value in the square and the key selected. If the square is empty, the selected value will be entered into the square. If the square has the same value as the entered key, the value in the square will be erased. If the square has a different value than the key, the square’s value will be changed to the new value.
| Cursors | |||||
| Empty Square: (Edit allowed) |
Filled Square: (Edit allowed) |
Fixed Square: (No edit allowed) |
|||
Additionally, while in “Pen” mode, you can use the “Enter’ key or the space bar to enter the currently selected value into the current square. The “Delete’ and “Backspace’ keys will remove the value from the current square, if it is set and editable. Similarly, in “Pencil” mode, the “Enter’ key and space bar will set the pencil mark for the currently selected value, wile the “Delete’ and “Backspace’ keys will erase the pencil mark for the currently selected value.
You can move the cursor from one square to another by using the arrow keys. The selection will move one square in the direction of the key pressed (left, right, up, or down).
Select the “New Game” button to have a board generated automatically. Don’t be alarmed if it takes a little while, as it sometimes takes 30 seconds or more to generate a solveable board.
The “Edit Game” button allows you to enter in your own initial board data. Enter values in the board in the same manner as you enter the values when solving a puzzle, by using the number grid in the upper left corner and clicking on the squares in the puzzle board or by using the keyboard. When you have finished entering the starting squares, click the “Edit Game” button a second time. This will switch back to game play mode, and the values you entered will now be uneditable.
While editing, there will be an “Erase All” button immediately beneath the “Edit Game” button. Click this button to erase all of the values in the game board, allowing you to start with a clean field.
The “Restart” button will clear all but the starting values from the game board, allowing you to start the game over. This is especially useful if you’re at a point where you’ve entered a value at some point that renders the game unsolveable, but can’t figure out which one.
If pencil marks are enabled (see the Pencil Marks option below), the next pair of buttons are “Mark” and “Clear”. These buttons will mark and clear, respectively, the pencil marks on the game board.
| A square with all of the pencil marks set: |
The next pair of buttons are the “Undo” and “Redo” buttons. As you may expect, these buttons allow you to undo the moves you’ve made and redo the moves you’ve undone. There is no limit to the number of moves you can undo or redo. It should be noted, however, that the redo ability is lost once you make a change to the game board.
The next pair of buttons are the bookmark buttons, “Save” and “Revert”. The “Save” button sets a bookmark at the current board state. The “Revert” button takes you back to the board state of the most recent bookmark. If you have saved multiple bookmarks, successive clicks of the “Revert” button step you back through them in order until you get to the first. There is no limit to the number of bookmarks you can set, and bookmarks are not lost once you revert back to them. It should be noted, however, that any bookmarks ahead of the current board state are lost once you make a change to the game board.
If hints are enabled (see the Hints option below), the “Hint” button will be next. Clicking this button will show one of the possible moves currently available, or a message saying that there are no hints available.
| Number Button showing the hint value | Square showing the hint location: | ||
| Not selected: | |||
| Selected: | |||
If the clock is enabled (see the Pause option below), the “Pause” button will be next. Clicking this button will stop the clock (and hide the board!) until you click the button, now labelled “Unpause”, again.
| The board when the game is paused: |
 |
The next button is the “Options” button. This button will open the options dialog, where you can configure many of the game options. These options are described in detail in the next section.
The final button is the “Mute” button. This button will disable all sounds wnile down. It will also display “Unmute”, indicating that when you release the button, sounds will be restored.
Select the “Options” button to configure how the game works. The Options dialog has eight tabs: Game, Tools, Sounds, Pencil Marks, Hints, Lasts, Errors and About. Each one is explained below.
The Game tab controls the type of board generated by the “New Game” button. The first option is a slider to set the difficulty of the board being generated. There are seven levels ranging from “Easy” to “Hard”.
The second option is a drop-down list of the various types of symmetry that a board can have. Symmetries constrain the location of the fixed values into a specific pattern. Because a Sudoku board is square, a number of rotational and mirror symmetries are available. Below are examples of the various symmetries available:
| Left/Right Mirror Symmetry | Up/Down Mirror Symmetry | Four-Way (vertical and horizontal) Mirror Symmetry |
|---|---|---|
 |
 |
 |
| For this symmetry, an imaginary vertical line from the top center to the bottom center defines the mirroring. Any square filled in the left half will have a corresponding square filled in the right half, and vice versa. | For this symmetry, an imaginary horizontal line from the left center to the right center defines the mirroring. Any square filled in the top half will have a corresponding square filled in the bottom half, and vice versa. | For this symmetry, two imaginary horizontal lines, one from the left center to the right center and one from the top center to the bottom center, forming a ‘+’, define the mirroring. Any square filled in any one of the four quadrants will have the corresponding square filled in each of the other three quadrants. |
| Diagonal (top left to bottom right) Mirror Symmetry | Diagonal (top right to bottom left) Mirror Symmetry | Four-Way (diagonal) Mirror Symmetry |
 |
 |
 |
| For this symmetry, an imaginary diagonal line from the upper left corner to the lower right corner defines the mirroring. Any square filled in the upper right region will have a corresponding square filled in the lower left region, and vice versa. | For this symmetry, an imaginary diagonal line from the upper right corner to the lower left corner defines the mirroring. Any square filled in the upper left region will have a corresponding square filled in the lower right region, and vice versa. | For this symmetry, two imaginary diagonal line forming an ‘X’ define the mirroring. Any square filled in one of the four regions (top, bottom, left, or right) will have the corresponding square filled in the other three regions. |
| Eight-Way Mirror Symmetry | 180° Rotational Symmetry | 90° Rotational Symmetry |
 |
 |
 |
| For this symmetry, four imaginary lines, one horizontal, one vertical, and two diagonal, define the mirroring, dividing the board into eight regions. Any square filled in one of the eight regions will have the corresponding square filled in the other seven regions. | For this symmetry, the corresponding squares are defined by rotation, not mirroring. The squares are filled in a manner such that, if the board is rotated 180° (one half turn) around the center, the positions of the filled squares will be exactly the same. | For this symmetry, the corresponding squares are defined by rotation, not mirroring. The squares are filled in a manner such that, if the board is rotated 90° (one quarter turn) around the center, the positions of the filled squares will be exactly the same. This holds true regardless of the direction of rotation (clockwise or counter-clockwise), and it also holds true if the board is rotated 180° (one half turn). |
| No Symmetry | ||
 |
||
| For this option, none of the squares are constrained. The populated squares are simply chosen at random, with no relation between them. |
The Tools tab has seven check boxes. The first, “Display an elapsed-time clock while solving the board”, activates a timer that appears above the game grid. When the clock is enabled, the “Pause/Unpause” button is also enabled. This allows you to pause a game and come back to it later with no advance in the game timer.
The second, “Display score while solving the board” is checked by default. When this box is checked, a score will appear above the board.
At this point, the scoring is very rudimentary. Eventually, the score will be weighted based on a number of variables, including game difficulty and the different highlighting options you have enabled.
The third, “Indicate when sufficient squares have a particular value entered” is checked by default. When this box is checked, the numbers in the grid in the upper left corner will turn from green to brown when there are at least 9 squares in the grid with that number. Assuming that there are no errors, this will inform you when you no longer have to try to place a particular number on the board. Note that this is only a change in color - the button continues to operate normally.
| Selection grid buttons | ||
| Normal | Complete | |
| Not selected: | ||
| Selected: | ||
The fourth check box, “Highlight squares in the grid that contain the selected value”, will turn any square in the board yellow if the value in that square matches the selected value in the upper left corner grid. The squares for the starting values will be a darker shade of yellow to indicate that the value cannot be changed.
| Highlighted Editable Square: | Highlighted Fixed Square: |
Similarly, the fifth check box, “Highlight empty squares in the grid that may contain the selected value”, will mark any empty square in the board with a green square in the location of the pencil mark for the currently selected value if that value does not occur in the same row, column, or block of that square. If pencil marks are enabled, the pencil mark for that value will appear in the green rectangle.
| Highlighted Available Location | ||||
| Without Pencil Marks: (‘7’ selected) |
With Pencil Marks: (‘6’ selected) |
|||
The last two settings require cookies to be enabled. These check boxes, which are normally checked, will cause your settings and your game board, respectively, to be saved when you leave this page. When you return, the values will be restored and you will be able to continue where you left off.
These last two features do not work with all browsers. I am working on this, but at this point, I don’t know when or if it will be fixed.
There are several events in the game that can have audible feedback. On this tab, you can configure which events have sounds and which events do not.
The first check box, “Enable sounds”, is the master sound controller. It is equivalent to the “Mute” button in the menu. In fact, the two are tied together, so that unchecking this option sets the “Mute” button down, and pressing the “Mute” button unchecks this option.
The remaining options control different sounds made by the game. The first, “Play sounds while a new board is being generated”, enables a series of beeps that play while the board is flashing colors to represent the process of generating a new board. The second, “Play a sound when the puzzle is successfully solved”, allows a small fanfare to be played when the final number is entered. The third, “Play a sound when there are errors”, provides audible feedback (buzzes) when you attempt an illegal move.
The fourth, “Play clock ticks when the clock is running”, enables the sounds of a clock ticking once a second as the game clock advances.
The next two provide feedback when entering values in the grid. “Play a sound when setting or clearing a value” enables sounds while entering or clearing values in “Pen”. “Play a sound when adding or removing pencil marks” enables sounds while entering or clearing values in “Pencil”.
The seventh, “Play a sound when a menu button is clicked”, provides audible feedback when clicking on the menu buttons.
The next two provide feedback when milestones are achieved during game play. “Play a sound when a value has been completely entered” chimes when the last of a particular value has been entered in the board grid. “Play a sound when a row, column, or block has been completely entered” chimes when the last value is entered into a row, column, or block.
Finally, “Play a sound when displaying hints” provides audible feedback when you request a hint by using the “Hint” button. If a hint is available, a chime plays. If there is no hint available for the current board state, a negative “uh-oh” sound is played instead.
Pencil marks are a way of keeping notes about what values may or may not be possible for a particular square. By default, pencil marks are disabled. However, checking the first check box, “Allow pencil marks in the grid when no value is entered”, will enable them.
| A square with all of the pencil marks set: |
When pencil marks are enabled, there will be four new buttons on the game board. Above the grid in the upper left corner will be two buttons marked “Pencil” and “Pen”. When the “Pencil” button is selected, clicking on an empty square will toggle a pencil mark for the selected value. Clicking on an entered square while the “Pencil” button is selected will have no effect. When the “Pen” button is selected, clicking on the board will be the same as it was before pencil marks were enabled.
A pair of buttons, labelled “Mark” and “Clear”, appear below the “Restart” button. Clicking on the “Mark” button will automatically fill all of the empty squares with pencil marks. Normally, pencil marks for all nine values will be entered. However, this behavior can be altered (see the “Only allow pencil marks for legal values to be entered” check box below). The “Clear” button will remove all pencil marks from the empty squares.
The second check box, “Automatically set pencil marks in the grid for a new board”, will automatically insert pencil marks in all of the empty squares of the board after a new game has been created. This will save you from having to do it yourself if you regularly use pencil marks to solve a puzzle.
The third check box, “Only allow pencil marks for legal values to be entered”, will not allow pencil marks to be entered for a value that already is entered in the same row, column, or block for that square. This affects manual entry, the automatic pencil marks entered if the second option is checked, and the “Mark” button.
The fourth check box, “Automatically erase pencil marks for illegal values”, should only be used while learning how to play or if you are really stuck while solving the board. This option will, when a new value is entered in the game board, find all of the squares in the same row, column, or block which have that value marked in pencil, and it will automatically erase the pencil mark for that value.
Hints are exactly what the name implies. The program will search the board looking for moves that can be made, and informs you of any that are found. Normally, hints are turned off. Selecting the first check box, “Enable hints”, will add the “Hint” button to the game board. The remaining three check boxes determine how the program reports hints to you when you click on the “Hint” button.
If you select “Display the hint as a message” the hint will display as a message below the game grid, along with a brief statement explaining why the indicated square must be the specified value. If you select “Indicate the hint position”, the indicated square in the game grid will display in light cyan. If you select “Indicate the hint value”, the number in the upper left number grid corresponding to the indicated value will also display in light cyan.
| Number Button showing the hint value | (not selected) | Square showing the hint location: | ||
| (selected) |
There are circumstances where the program is unable to provide help. When this happens, no value or position will be highlighted, and a message saying that no hints are currently available will display below the game grid.
If you select “Display the hint as a message”, you can also move your mouse over the message to get a more detailed explanation feature of why a square cannot contain other values. This only applies when the hint states that the hint is based on eliminating impossible values or locations.
The “Lasts” tab allows you to set indicators for four special conditions that may occur in an empty square. For each of these conditions, you can select the following options from a drop-down list:
The first condition, “When there is only one empty square for a row, column, or block”, is a situation where all but the last value have been entered in a given row, column, or block. The highlight color for this situation is normally light blue, but will be light green if the “one color” option is selected.
| Normal: | Highlighted: |
The second condition, “When there is only one legal square for the last of a particular value”, is a situation where all but the last position of a particular value have been correctly entered in the game grid. At this point, there is only one square on the entire board where that value may be entered. The highlight color for this situation is normally beige, but will be light green if the “one color” option is selected.
| Normal: | Highlighted: |
The third condition, “When there is only one available square in a row, column, or block for a value”, is a situation where all of the squares in a row, column, or block except one have a given value excluded. Since every value must appear in each row, column, or block, the one remaining square must contain the given value. The highlight color for this situation is always light green, the color used when the “one color” option is selected.
| Normal: | Highlighted: |
The fourth condition, “When there is only one legal value for a square”, is a situation where all but one value have already been entered into the row, column, or block of a given square. At that point, there is only one value that may legally be entered into the square. The highlight color for this situation is normally magenta, but will be light green if the “one color” option is selected.
| Normal: | Highlighted: |
Below the drop-down lists for the four situations, there are three check boxes that allow you to modify the standard appearance of the indicators. The first, “Use one color to indicate any of these situations”, overrides the default colors for the background, and uses the same color (light green) for all of the indicators. The second, “Highlight the currently selected value for these situations”, uses a darker shade of the background color for those squares where the value to be entered is the same as the currently selected value in the selection grid in the upper left corner. The last, “Only indicate the currently selected value for these situations”, will hide any of the four indicators for any square where the value to be entered in the square is not the same as the currently selected value in the selection grid in the upper left corner. This is useful if the sheer number of indicators is overwhelming, or if you get confused between the light and dark squares.
If you have pencil marks enabled and have selected “Indicate the location” (not “Indicate the location and value”), there may be more than one pencil mark in a highlighted square. You will have to figure out for yourself which pencil mark is the correct value, or use the “Highlight the currently selected value ...” or “Only indicate the currently selected value ...” options to show you when you have selected the correct value.
| Which value should be entered? | ||||
| Highlighting can help you know. | ||||
| Indicated: (Can’t tell for sure) |
Highlighted: (The currently selected value is correct) |
|||
| Indicator limiting can also help you know. | ||||
There are essentially only four possible errors in a Sudoku grid. On this tab, you can choose which one(s) to display.
The first, “Indicate when there are no legal values for a square”, will highlight a square in light red when entering any value in the square will cause a conflict somewhere on the board.
| No legal values error: |
The second check box, “Indicate when a value is not possible for a row, column, or block”, will indicate when one or more values cannot be entered into a particular row, column, or block without causing a conflict somewhere on the board. The affected row, column, or block will be shown with a red border. The value or values that cannot be entered will be indicated by a red ‘X’ in place of the appropriate pencil mark.
| Row Error (7 and 8): | Column Error (5): | ||
| Block Error (1): | 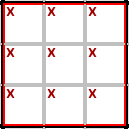 |
||
The third check box, which is normally selected, is the “Indicate when a value is duplicated in a row, column, or block”. When a row, column, or block contains the same value in more than one square, all of the occurrances will be indicated by the duplicated value being written in dark red, rather than the normal black.
| Duplicate value error (fixed): | Duplicate value error (editable): |
The fourth check box is the “Indicate when two or more values must go in a single square” option. When the only possible square in a row, column, or block for a particular value is also the only possible square in a row, column, or block for one or more other values, the positions of the pencil marks for all of the values will be indicated by a red background square. If pencil marks are enabled, the values will appear within the background squares.
| Multiple values for a square error: | |
| Without pencil marks: (2 and 6 in this example) |
|
| With pencil marks: (3 and 7 in this example) |
|
At the bottom of the “Errors” tab is a slider called “Missing Value Search Depth”. This tells the program how hard it should look when detecting the first two error types. A value of 1 (the default) indicates that the program should only look at the values entered into the grid itself. A value of 2 indicates that the program should apply rules during the analysis, and eliminate values that, while technically still valid, cannot be entered and still allow the game to be completed. A value of 3 indicates that the program should apply even more in-depth rules during the analysis, and eliminate still more values.
This tab provides technical information about the program, along with a brief description.
At this point, there are very few features to be added to the game.My current wish list includes the following:
The only bug currently known about is the potentially long delays generating a board. I am working to improve on this, but it’s proving to be more of a challenge than I would have hoped.
I have taken some steps to mitigate the delay. If the combination of difficulty level and symmetry takes more than about 30 seconds to generate a board, the generator automatically steps the difficulty down one level and tries for another 30 seconds. This continues down to difficulty level one, if necessary.
I do have some tips for people playing JSudoku, especially those who are new to the game of Sudoku in general.
If you are new to Sudoku, enable all of the options on the “Pencil Marks”, “Hints”, and “Errors” tabs. Check all of the options on the “Tools” tab except the “clock” option (you don’t need the pressure while you’re learning the game). Select “Indicate the location and value” for all four situations on the “Lasts” tab, and check the “Highlight the currently ... ” check box. Uncheck the “Use one color ... ” option so that you can learn to recognize each of the different situations. Uncheck the “Only indicate ... ” option so that you will know what values are available to be entered.
Move the slider on the “Errors” tab to the highest value, and move the slider on the “Game” tab to “Easy”. Then, generate a new game and have fun. As you become more familiar with the game, modify the options so that you are relying on your own logic more and the game’s logic less.
First, choose your options carefully. It is quite tempting to enable all of the many hints, guides, highlights, errors, and marks available to you. However, running with all of the options on can easily overload you with the sheer volume of information. Compare the two boards below:
| Nothing enabled: | Everything enabled: | |
 |
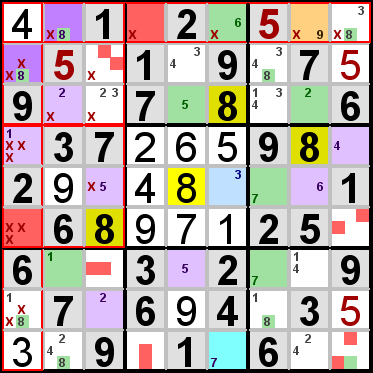 |
Obviously, I have intentionally staged this point in the game to make the second board appear as bad as it does. I think it does a great job of illustrating my point, though. By choosing a subset of the available options, the board below shows that I have some errors, I have some valid moves available, and where the current value (8) has been entered and should be entered. Your preferences may be different, so choose those options that you are comfortable with, but, again, be sure not to overwhelm yourself with information.
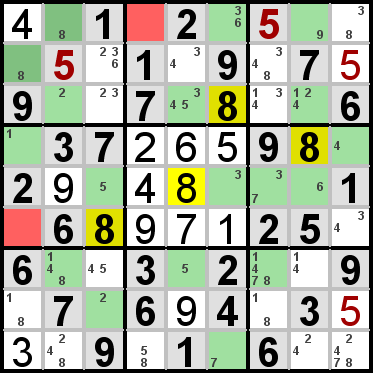 |
Always eliminate errors before relying on hints, lasts, or available highlighting. The information provided is based on the current state of the board, not on the ultimate solution. If the board has errors, the information provided by the hints, lasts, or available highlighting may be invalid.
If you have the “Highlight empty squares ... ” option on the “Tools” tab selected, and any of the situations on the “Lasts” tab set to “Indicate the location“ or “Indicate the location and value“, remember to enter values in the beige, magenta, green and blue squares before entering in values for the small green “available” marks. The “full square” highlighting indicates that there is only one legal value for that square, while the small green marks merely indicate that the selected value may be valid for that square.
Be careful not to just enter the current value into any beige, magenta, green or blue square, though. Unless you have the “Only indicate ...” option selected, some of the indicated squares may be for values other than the current value. If you aren't sure, use the “Indicate the location and value“ option or use highlighting. Highlighting can still be tricky, though. If all of the indicated locations are for other values, none of the squares will be highlighted, which may appear the same as if all of the values are highlighted (especially when there are only a few indicated squares).
If you have error-checking enabled, and the error indicators appear when you enter a value in a square, simply click the same value again to erase it. Then you can go back and try to figure out why the value you entered is not valid.
Finally, trust the program. I’m not saying that the program doesn’t have any bugs (I’m sure that it does). It is just more likely that you made a mistake. There have been several times during testing where I thought that I had found a bug in the program that either led me astray or created a board that couldn't be solved, only to find after restarting that I had made the error. Sometimes, I would make the same error on the same board over and over again, until I finally figured out what I was doing wrong. In the end, the game was right each and every time.
It is difficult to come up with a satisfactory and consistent rating system for difficulty levels. Several factors play a part, including the number of values entered into the starting grid, the number and complexity of the rules that you need to use to figure out the values, how many values become “known” after a particular value is entered, &c.
Adding to the complexity is the fact that each player uses a different default solving technique. Often a particular board favors a particular technique, so that board does not seem to be as difficult to a player who uses that technique. Similarly, another board may not be as easy to solve using the same technique, so a player using that technique will find that board harder to solve. Similarly, the different indicator and highlighting options you choose will work better with some boards than others.
In short, you should use the difficulty levels as a guideline for what to expect, but don’t be surprised if different boards at the same level seem easier or harder for you.
I have tested my routine for determining difficuly levels against other published Sudoku games (mostly from newspapers and puzzle books), and I have found a strong correllation between the difficulty levels I assign and the difficulty levels assigned to the puzzles by their authors. As an example, Conceptis Sudoku (http://www.conceptispuzzles.com/index.aspx?uri=puzzle/sudoku) supplies the puzzles for our daily paper, the Kennebec Journal (http://www.kjonline.com/). Their rating system consists of one to five stars. With very few exceptions, my rating routine assigns a difficulty level one higher than the number of stars they assign (★=2, ★★=3, ★★★=4, and so on). Because of this testing, I believe that you will find my rating system to be as consistent as any other.
Finally, there is one more item to note about difficulty levels in this game. When you choose the difficulty level from the slider on the “Game” tab of the game options, this usually constrains the difficulty to a very narrow range. In other words, for all of the difficulty levels but one, any board that is easier or harder is rejected. The one exception to this is the “Hard” level. For this level, only easier boards are rejected. A board that is rated harder than the actual level specified (currently 7) is still considered to be hard. This is indicated on the slider by the plus sign in the label , which displays “Hard (7+)”. After the board is generated, the actual difficulty level as determined by my rating routine is displayed above the board. Most of the time, it will be a 7, since harder boards are less likely. Just be warned that an occassional board will be more difficult.
There’s not much else to say at this point. Enjoy playing the game and please let me know if you find any issues.